Fixing "no brightness setting" on Windows 10 for AMD graphics cards
This post walks you through solving the infamous "no brightness" issue caused by an incompatibility between AMD's latest drivers with Windows 10.
On a random day last year, my laptop flickered and was suddenly on full brightness by default, and the brightness setting totally disappeared from the Settings under Display. My keyboard shortcuts stopped working for brightness, in spite of the fact that the volume shortcuts still were. Worst of all, I couldn't use f.lux, either. It made night work feel like you're staring into the sunrise.
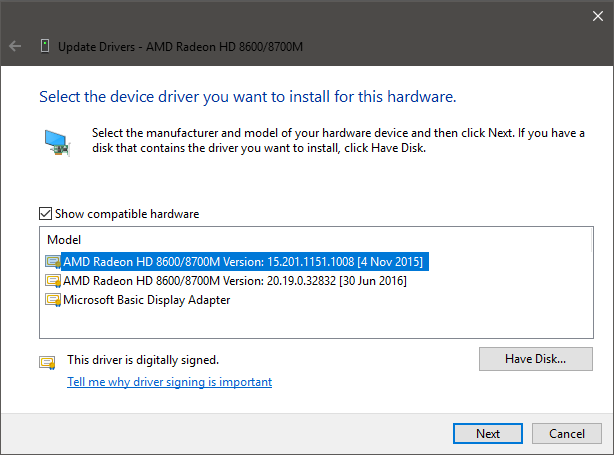
Select the oldest version available on the list. For my case, it's the one dated 4 November 2015.
When the update is in progress, your screen may flicker prominently a few times. This is a sign that it's updating its driver for your graphics card.
Afterwards, you should be able to change brightness again.
Hope this helps!
Problem
I've been plagued by this issue for months, to the extent that I was willing to buy a new laptop just to get around this issue.On a random day last year, my laptop flickered and was suddenly on full brightness by default, and the brightness setting totally disappeared from the Settings under Display. My keyboard shortcuts stopped working for brightness, in spite of the fact that the volume shortcuts still were. Worst of all, I couldn't use f.lux, either. It made night work feel like you're staring into the sunrise.
Before you start
Some things to look up and note to do away with hiccups or moments of doubt when you're solving the problem:
Know your AMD graphics card.
If you're using a laptop, you can find the graphics card information on the right-hand side surface of your laptop, below your keyboard.
If you're using a desktop, you can run "dxdiag" directly from the Start menu to open the DirectX Diagnostic Tool. From here, navigate to the Display tab to see your graphic card information under "Device".
If you're still not sure, you can refer to AMD's own guide, "How-To Identify the Manufacturer and Model of an AMD Graphics Card".
Know which version of Windows 10 you're running on.
There are still people, like me, who get eternally confused as to whether my system is 32-bit or 64-bit. To know which system you're running on, head over to Settings, then go to System. At the bottom of the left pane, click on "About".
You'll see your OS information on the right pane, and you'll find your system version under "System type".
Steps to solve
The gist of this problem is that your computer has the latest available AMD driver installed; it just doesn't work even though it's legitimately there. Because your computer doesn't see this as an error or absence of a driver, it sees no discernible problem to fix.
What you need to do is to remove all traces of your current AMD driver, then ensure that you install an earlier version of it that was compatible with Windows 10.
1. Uninstall your current AMD driver.
Go to Device Manager (either by searching from the Start menu or by navigating from Settings).
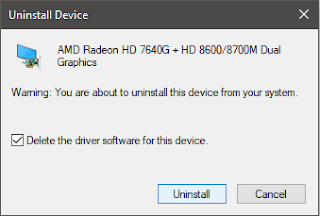
Under Display adapters, right-click on the AMD Radeon driver and select "Uninstall device".
When you click on "Uninstall device", your system prompts you for confirmation:
Here, make sure to tick "Delete the driver software for this device."
When you uninstall, your computer won't cease to display from its monitor. You're simply removing drivers it isn't able to use in the first place.
Do this for all existing AMD drivers under Display adapters.
When you're done, you will no longer see these drivers listed under Display adapters.
2. Install the latest driver software from the AMD website.
This may seem counter-intuitive from what we're trying to achieve. Don't worry, we'll get to where we need to be.
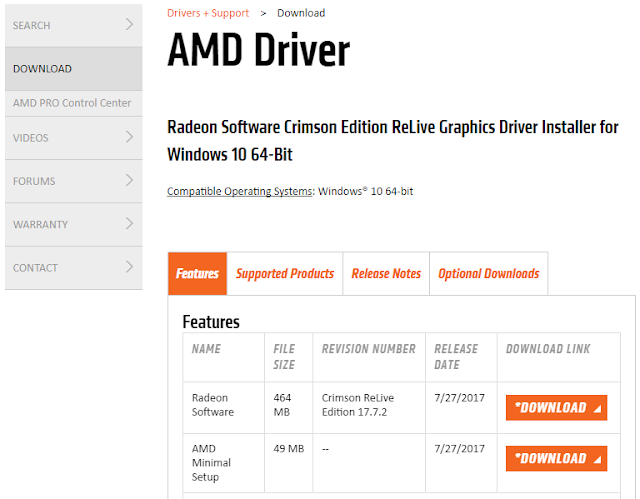
When it comes to AMD graphics card drivers, all roads lead to Rome. Whether you search for a specific model or a specific software, you'll likely be led to this page:
 |
| Links: 32-bit and 64-bit versions |
Download, install, and run the AMD Radeon Software Crimson ReLive Edition. The steps you'll take will look a lot like the ones on AMD's guide, "How To Install Radeon Software Crimson ReLive Edition on a Windows Based System".
When you go through the installation, it doesn't matter whether you choose "Express Install" or "Custom Install", as long as you include the AMD display driver in the installation.
Restart your computer, as prompted. Don't get excited yet, though. After this step, you'll likely not see any change yet.
3. Downgrade your driver to an earlier version.
After Radeon Software Crimson ReLive Edition installs the most recent driver available for your system, it makes earlier versions of your graphics card drivers available for you to choose.
Head over Device Manager once more. This time, right-click on the driver listed that most closely reflects your graphics card model and select "Update driver".
When asked how you want to search for drivers, select "Browse my computer for driver software".
On the next window, select "Let me pick from a list of available drivers on my computer".
This will load a few surprising options you never thought you had:
 |
As a sign that I am on the right track, this list shows me the correct graphics card model series. (I am using AMD Radeon HD 8750M, which falls under the HD 8000M series.)
|
When the update is in progress, your screen may flicker prominently a few times. This is a sign that it's updating its driver for your graphics card.
Afterwards, you should be able to change brightness again.
What if the issue happens again?
Funnily enough, I couldn't change my screen brightness the day after I fixed this issue. I simply repeated step 3, and got my brightness control once more.Hope this helps!


Comments
Post a Comment